Wednesday, 28 December 2016
How to Migrate Data from MBOX to Office 365 Platform?
There is no direct method that allows you to convert MBOX files to Office365.
Nevertheless, you could convert MBOX files by opting for a two-step procedure.
When we say the two-step approach then the first step you require to follow is
converting MBOX files into PST and after that import PST files for easy
migration of MBOX into Office 365. This method can be extremely beneficial if
you want to move with technology and upgrade features.

Follow the steps mentioned below to reach one step
closer towards MBOX to Office365:
To start with let us consider your
system is installed with Thunderbird Email Client or any other email client that
supports .mbox file format for storing email data.
-
Run Mozilla Thunderbird email
client on your system.

- Select the folder and after that press Ctrl + A.
- Right click on the particular messages and then select Save As Option.
- Browse down the destination folder on your system, and after that open Microsoft Outlook.
- Create a fresh folder on Outlook by right clicking on the present folder and after that select Create a new Folder.
- Rename the folder
- Drag the entire selected emails that you have exported from Thunderbird to MS Outlook.
(Note: It is very important to
understand that the manual approach is only effective when you require to
export only the limited emails from MBOX to Office365)
Once this entire procedure of dragging the email items gets completed, you would
be able to have the clear preview of old emails of Thunderbird from MS Outlook
interface. After this, the next key procedure you require to opt is uploading
the resultant Outlook PST file data to Microsoft Office 365.
Pre-requisites to Export PST to Office 365 using Outlook
Here are the following steps that are required to be followed
before you import pst to Office 365 using Outlook.


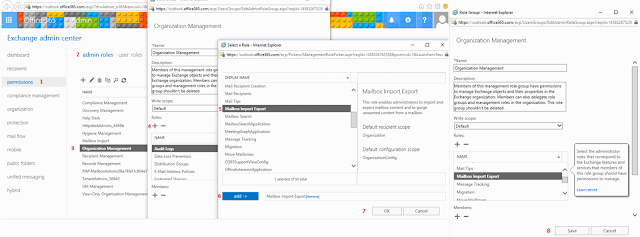
- Open Exchange Admin Centre
- Click Permissions>>Admin Roles
- Double Click on Organization Management
- Click + Roles
-
Select Mailbox Import/Export

- Click Add>>OK>> Save
Alternatively, as a user you can very effectively create a new role group
and assigned a permission to the account. However, you must note that the
required Outlook PST file would be imported that stores on network file or file
share on local system.
Step 1. Launch AzCopy.exe Network Tool
Initially provide a storage key and upload the URL.
- Navigate to https://protection.office.com
- Sign in with a Global Admin account for user’s organization
- Click on Data Management and after that select an Import option
- Go to the Import Service and then click on + symbol
- Click on upload files over the network
-
View Popup page, click on Azure download tool

- Click Run>>Next. Agree to EULA and after that press on Next tab
- Agree the default installation location and after that click on Next>>Install>>Yes>>Finish
Step 2. Acquire Storage Key and Upload URL
Now, upload secure key and the URL prior to the AzCopy tool
in order to further upload the Outlook PST file(s) to Office 365.
- Open the Import Data to Office 365 page
-
Click the + icon

- Click to copy the Key. Press Show URL for MS PST file
- Again copy key and URL
Step 3. Upload the PST File(s) to Office 365
Now after you have successfully downloaded and installed the
AzCopy tool and acquired the secure key and URL, the respective PST file is
required to be migrated.
- As an admin open a command prompt
- Open the directory where you had installed AzCopy
- Run the following command in order to successfully upload the Outlook PST Files
- AzCopy.exe /Source:\\SERVER01\PSTshare/Dest:/SERVER01/PSTshare//Destkey:/S /V:C:\PSTshare\Uploadlog.log
Step 4: Create the PST Mapping File
Here, you would require to create CSV files to effectively
map the PST file to the mailbox in Office 365.
- Download the PST Mapping Template File from Microsoft
- Complete the CSV file with users’ specific information, filling in as many lines as needed. One line per PST file uploaded
- Save the PST Mapping File
Step 5: Create Office 365 for importing
Localize to https://protection.office.com
and once again login with Global Admin account.
- Click Data Management>>Import>>Import Service
- Once again, click on + icon
-
Press to Upload files over the network

- Mark and fill the respective credentials and Click on Next tab
- Agree on the given conditions and then click Finish
Finally, after following all the steps, you can very well
check the status through navigating to Office 365 Admin centre and again open
the import option. Click on the refresh button to get back the updated status.
Click on job and view the details to troubleshoot the status message. This
entire procedure of manually migrating data from MBOX to Office 365 can work
well only to certain extent but can be troublesome for the users who want
to migrate their data quickly. You can overcome these difficulties with the help
of a third party tool like RecoveryFix for MBOX to PST Converter.
RecoveryFix for MBOX to PST Converter
This software allows you to effectively
migrate your mailboxes from different range of
MBOX, MBS or MBX supported desktop email clients.
The great aspect of the software is its excellent functionality to export MBOX
files directly to cloud-based Office 365 mailbox. Also, the utility
is well integrated with filter option that in turn allows user to
segregate specific items from MBOX file. Adding to that, the software supports
all versions of MS Outlook platforms including 2016.
For more information about the software, see : http://www.recoveryfix.com/mbox-to-pst-converter/
For more information about the software, see : http://www.recoveryfix.com/mbox-to-pst-converter/
Subscribe to:
Comments (Atom)